Thursday, August 18, 2016

Antique Dresser: What to do when the drawers are broken...make doors!


I had the honor of another "cast off" dresser finding me.  It was the call from the curb, like a Batman Signal in the sky that came through social media to me from a friend.  There was another dresser ready to hit the great landfill in the sky and I had to come rescue it.  I have to admit, when I first saw the dresser, it did seem a little beyond repair but I took it.  At the minimum, it could be used for parts, and at the most, my biggest challenge.  I took the dresser and the challenge.  It was one problem after another but the final result is a big Second Chance in PA for this baby.
 
Based on the markings on the back, this dresser appears to have first been a shipping crate headed for Peacock/Stafford, KS or from this city.  Someone must have turned it into a dresser with drawers and they did a great job.

These drawer fronts had already broken off so I used an electric sander
Look at that gorgeous wood grain!
I first began with TONS of sanding by hand to peel away the cracked stain and finish.  The drawer fronts had already broken off so I could sand them easier.  After realizing that two drawers were beyond repair, I decided to glue them together, along with the center separator.  The idea was to glue them, saw them in half, and have two doors!  However, the center keyholes presented the problem so I cut them off too in order to have a center divider like with kitchen cabinets. 
 
Center separator removed
Glued together
And then cut for future doors!
 
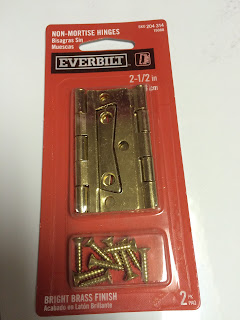
Before the doors were complete, I needed to fill in the holes from the drawer handles and redrill new holes for door handles.  I also had to add hinges.  This was the biggest challenge.  A dresser drawer was not designed to swing open.  After much reworking, I landed on the non-mortise hinges and made the adjustments.  I also purchased vintage hardware from eBay and stained the wood in Black Cherry.  The result was perfect!


And the final product was just how I envisioned it and NOTHING like the sad castoff on the curb.  It's ready for a new home!


Thursday, June 30, 2016

This End Up headboard and footboard baseball makeover (Part 2 Bedroom)

Footboard Before and After

This is part 2 of the bedroom makeover from old This End Up furniture to a little boy's baseball-themed room.  It continued with the headboard and footboard.  I added a baseball diamond to the footboard so it would be facing out to the room.  I first applied Zinsers 1-2-3 primer right on to the wood, followed by the paint, and then Minwax Polycrylic in satin.
The finished diamond

For the headboard, I drilled two worn baseballs into the headboard posts and painted "slugger" in the center.  I did the same as above with the primer and paint and Polycrylic.  Since my handwriting is not the best, I used stencils for the letters.


The baseballs make a perfect spot to hang a hat!

Saturday, June 25, 2016

This End Up Night Table Makeover to Baseball Theme (Part 1 bedroom)


It started with a dresser by This End Up that a friend asked me redo for her grandson into the baseball style dresser she had seen earlier (click here for the first baseball dress).  You'll see that dresser in part 3.  But then I stumbled upon a matching night table and I ran with the baseball theme.  I wanted to keep the wood showing through so I opted for painting just the side panels.  Both sides of the night table were given the Zinsers 1-2-3 primer.  Then a coat or two of white paint.  I scuffed it up a bit and then added the Phillies "P". 


I used the MinWax Polycrylic in Clear Satin to seal in just the painted sides.  And with that, there's a finished night table for a little boy's room!

Monday, May 2, 2016

Turning Wood Scraps into a Garden Cage

We don't see many animals in our suburban backyard, however, when I plant lettuce and other spring crops, I swear a siren goes off alerting all the animals to come sample.  Last fall, it got so bad that I was unable to harvest anything.  If it wasn't the birds scratching in the soil, or the squirrels looking for seeds, then it was the rabbits and foxes coming to sample what had grown.  Fortunately, the deer were distracted by my neighbor's apple tree.  So, I sketched out a design for a mesh cage to sit on top of my smaller garden for the spring and fall crops.  It had to be removable for the taller tomatoes and cucumber trellis.  Here's the end result.
To build your own cage (which is also conventient for throwing a tarp on during those frost/freeze warnings at night) you only need a few supplies. 
We started with 6 pieces of 1x2s and 4 pieces of 2x4s.  They were cut down to size.  Since my 4x4 raised bed was not exactly 4x4, we had to cut the pieces accordingly.  So be careful to measure your bed first.  I also wanted to make the the back of the cage slightly taller than the front so that I could grow taller plants in the back like broccoli or romaine.

The final measurements and other supplies:
2x4s = 12" (2 for the back) and 8" (2 for the front). 
1x2s = cut according to my raised bed with the top side pieces being slightly longer to angle up.
2 exterior hinges
2 1/2' wood screws (and bolts to make it easier to remove for summer planting)
Deer resistant mesh
Staple Gun to attach mesh to the frame

Assemble the pieces on a flat surface.  We used the garage.  Then attach it to the raised bed.  Since I have a fence behind my garden, I can just rest my cage against the fence when it's open.  Otherwise, just get another 2x4 to prop it open while you plant/harvest.
 As of today, my spring lettuce is ready to eat and not a single critter has sampled them first!

Wednesday, January 6, 2016

Repurposed Dresser into Sitting Bench with Drawers

Before (dresser) and After (bench)

Sometimes you get tired of doing the same old thing, and in this case, dressers.  I seem to be drawn to dressers, and they find me, but the choices are to stain or paint.  This time, I decided to cut it in half!  I've seen this idea before but could never justify halving a dresser until now.  This dresser came to me looking pretty good on the outside (minus the crack and wear on top), but it was missing all but one center support for the drawers.  Not only would I have to rebuild those center supports, but most of the side supports were splintering under the weight of the drawers.  So, I decided to get rid of the top two drawers and keep what was not as broken.

Top of dresser crack that did not go all the way through


Missing finish and water damage on top
Pior to cutting the dresser, I sanded down the top, the sides to where the cut would be made, and the drawers.  And then process began, with the help of my husband to cut this dresser horizontally!  Using a piece of wood as a guide, we cut it in half.
Just Cut!
And the bench is beginning to take shape!
Just a shell for now
At this point, I had some work to do on fixing up the imperfections.  These included:
>Filling the crack on top with stainable wood filler
>Strengthening the side supports
>Adding back the center support
>Adding MDF to the underside of the top piece to distribute weight for a bench
>Adding a new piece of MDF to the back
Flipped upside down to screw in the MDF to the top support and the top of the chest

More fixing upside down
Ready for stain and drawers!
I always use the Minwax Pre-stain Wood Conditioner first, and then add 2 coats of stain followed by 3 coats of Polycrylic. 
 
Staining with Minwax
And the finished product!  Since the drawer pulls were needed by the previous owner, I added in new darker knobs for the finished piece.
Perfect height for a bench and plenty of storage!


The lighting made the close up look dark but it gives you a good view of the grain and knobs.
List Price: $125

In an effort not to waste the remaining pieces, the top drawer was already sold off as an underbed storage drawer.  With $2 furniture sliders added to the bottom, it sold for $30!  The other drawer and small side pieces will go in the wood bin for a future project.